When you run a parallel job, any error
messages and warnings are written to an error log and can be viewed from the
Director. You can choose to handle specified errors in a different way by
creating one or more message handlers.
A message handler defines rules about how to handle
messages generated when a parallel job is running. You can, for example, use
one to specify that certain types of message should not be written to the log.
You can edit message handlers in the DataStage Manager
or in the DataStage Director. The recommended way to create them is by using
the Add rule to message handler feature in the Director.
You can specify message handler use at different levels:
Project
Level. You define a project level message handler
in the DataStage Administrator, and this applies to all parallel jobs within
the specified project.
Job
Level.
From the Designer and Manager you can specify that any existing handler should
apply to a specific job. When you compile the job, the handler is included in
the job executable as a local handler (and so can be exported to other systems
if required).
You can also add rules to handlers when you run a job
from the Director (regardless of whether it currently has a local handler included).
This is useful, for example, where a job is generating a message for every row
it is processing. You can suppress that particular message.
When the job runs it will look in the
local handler (if one exists) for each message to see if any rules exist for
that message type. If a particular message is not handled locally, it will look
to the projectwide handler for rules. If there are none there, it writes the
message to the job log.
Note that message handlers do not deal
with fatal error messages, these will always be written to the job log. You cannot add message rules to jobs from an earlier
release of DataStage without first re-running those jobs.
Adding
Rules to Message Handlers
You can add rules to message handlers 'on the fly'
from within the Director. Using this method, you can add rules to handlers that
are local to the current job, to the project default handler, or to any
previously-defined handler.
To add rules in this way, highlight the message you
want to add a rule about in the job log and choose Add rule to message
handler... from the job log shortcut menu or from the Job menu on the menu bar.
The Add rule to message handler dialog box appears.
To add a rule:
1. Choose
an option to specify which handler you want to add the new rule to. Choose
between the local runtime handler for the currently selected job, the
project-level message handler, or a specific message handler. If you want to
edit a specific message handler, select the handler from the Message Handler
dropdown list. Choose (New) to create a new message handler.
2.
Choose an Action from the drop
down list. Choose from:
– Suppress from log. The message is not
written to the job's log as it runs.
– Promote to Warning. Promote an
informational message to a warning message.
– Demote to Informational.
Demote a warning message to become an informational one.
The Message ID, Message type and Example
of message text fields are all filled in from the log entry you have currently selected.
You cannot edit these.
3. Click Add Rule to add the new message rule to the chosen handler.
Managing
Message Handlers
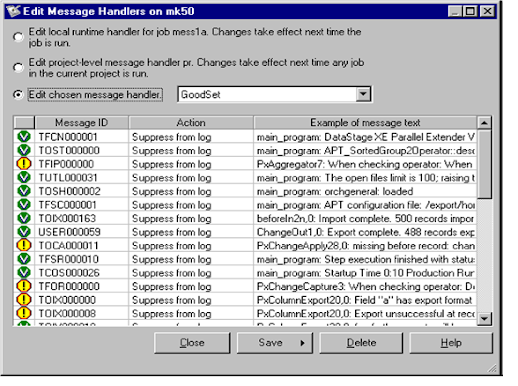
To open the Message Handler Manager,
choose Tools ➤
Message Handlers (you can also open the manager from the Add rule to message
handler dialog box). The Edit Message Handlers dialog box appears.
Message
Handler File Format
A message handler is a plain text file and has the suffix .msh. It is stored in
the folder $DSHOME/../DataStage/MsgHandlers. The following is an example
message file.
TUTL 0000311 1 The open file limit is 100;
raising to 1024…
TFSC 0000011 2 APT configuration file…
TFSC 0000432 3 Attempt to Cleanup after
ABORT raised in stage…
Each line in the file represents message
rule, and comprises four tabseparated fields:
- Message
ID. Case-specific string uniquely identifying the message
- Type.
1 for Info, 2 for Warn
- Action.
1 = Suppress, 2 = Promote, 3 = Demote
- Message. Example text of the message


